Tag Archives: recipes

Homemade hummus

Small bowl of hummus with a slice of lemon and a salad leaf

The secret to hummus lies in its ingredients.

Jump to hummus recipe

Forget cooked chickpeas in tin or jar. Using dried chickpeas from scratch makes all the difference.

A jar/tin of ready-cooked chickpeas is OK in a hurry BUT the texture will be more mushy.

Why use dried chickpeas from scratch?

  • They keep their shape
  • They have more nutrients than canned
  • They double in size
  • They are cheaper
  • and if you do not use them for hummus, they can be sprouted.

While the dried chickpeas are soaking in water (recipe below), let me tell you about The Bean Book by Rose Elliot. A life-changing cookery book, it introduced me (in the early ’80s) to the magic of beans and other pulses, one of the first crops humans grew. The dried seeds of pea-family plants (or legumes) are nutritional powerhouses.

A vegetarian cookery pioneer, Rose Elliot explains the art of mixing proteins from two different plant foods such as pulses/nuts/seeds/grains to get super-charged protein. Chickpeas (pulse) + sesame tahini (seed) equals protein-rich hummus. The raw garlic and lemon juice adds immune-boosting vitality.

Use organic ingredients if possible too. Farming which works with nature adds to the taste. Enriched with nature’s fertilisers (sun/compost/clover etc), organic soils are teeming with life so have a wider range of minerals/nutrients for the plants. Without chemical fertilisers, crops work a bit harder, producing more flavour compounds. Soluble chemical fertilisers (particularly nitrogen) make non-organic crops grow fast – but sappy. Organic produce has a lower water content. All this adds up to richer, more complex taste. Just a thought.

A clear bottle of extra virgin olive oil, dried chickpeas in a jar, jar of tahini (brand: Bodrum organic), 3 lemons and 1 bulb of garlic.
Hummus cast assembled from left clockwise: olive oil, chickpeas, tahini, garlic and lemons.

Hummus Recipe

Ingredients

  • 200g or 1 cup of dried chickpeas (or 400g of cooked chickpeas)
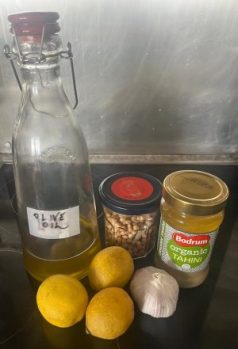
  • 1-3 lemons squeezed (about 4-6 tablespoons of juice)
  • 2-4 cloves of raw garlic, peeled (minced by hand if not using electric blender)
  • 4-6 tablespoons of olive oil
  • 4-6 tablespoons of tahini (ground roasted sesame seeds)
  • Salt and optional cumin to taste.

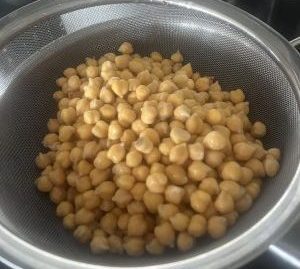
Cover about 200g of dried chickpeas with plenty of water so they have space to swell (swell. What a word).

Ideally you have access to an electric handblender or food processor. I use a Nutribullet. You could use a potato masher if doing it by hand. If so, ensure the garlic is well-crushed before adding.

The amounts of garlic and lemon juice depends on you. I use lots of both (three lemons and five garlic cloves). Ditto with olive oil and tahini. I have given guidelines so you can adjust accordingly.

Method

Start by soaking about 200g of the dried chickpeas in water overnight (or use boiling water and soak for about an hour until plumped up). Drain then add to a pan with fresh water, and simmer for about 45 minutes. Once cooked (soft enough to munch but not mushy), drain the chickpeas and let them cool down a bit.

Cooked chickpeas drained in a sieve over a pan
Draining chickpeas

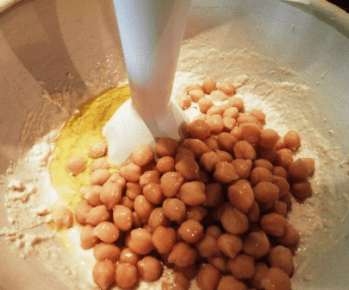
If using a Nutribullet, put the raw garlic in the goblet first with the oil and lemon juice so, when you turn the goblet upside down to whizz it, the blades can crunch down. Then add tahini and cooked chickpeas. Add salt/cumin to taste.

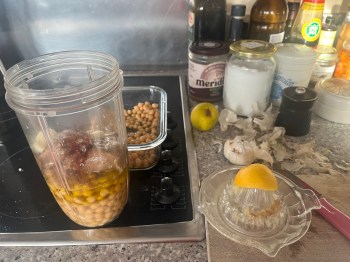
Above is a pic of kitchen chaos. No homemade hummus ever comes out the same, the mystery of homemade.

Blend until its consistency (above image with nutribullet, below, using a hand blender).

For a smoother hummus, add some chickpea cooking-water, a cautious tablespoon at a time. Or add more olive oil. Blend in two batches to vary texture between smooth and whole chickpeas.

Serve with a whisper of paprika to add colour, and a trickle of olive oil. Store in the fridge for three-five days.

Good luck and let me know how you get on.

P.S. This blog on hummus is dedicated to Unreal, the UK charity for people with depersonalisation and derealisation.

Healthy grain-free fruit cake

Made for a special birthday, this recipe is a KEEPER.

Billed as a quick and healthy Christmas cake, it is grain-free and gluten-free. It is delicious and – thanks to soaking the dried fruit – delectably moist. The five eggs make it very light and nutritious.

It requires careful weighing but apart from that, low on faff.

(And thanks to Tayda for careful weighing.).

Use dried fruit of your choice. I went for dried cranberries and sour cherries, and chopped-up dried apricots and dates. Snip with scissors, as the original recipe suggests. Saves on sticky fingers.

I used cassava flour instead of coconut flour. Cassava flour is white and neutral, and made from a root vegetable. Next time I am going to experiment with buckwheat flour because buckwheat is a plant and so less carbs than root veg. (I love buckwheat – but that is for another post).

I used ground almonds as it is equivalent to almond flour/meal. And chopped pecans (chopped walnuts or hazelnuts etc and/or a mix would also work). I did not have vanilla extract and it was fine without (otherwise add 1 teaspoon).

I did not bother glazing it as suggested – and really did not miss it.

Here is the recipe, slightly simplified for my own use.

Recipe

  • 500 grams mixed dried fruits
  • 75 grams pecans or walnuts
  • 1 orange (zest and juice)
  • 125 grams ground almonds
  • 67 grams coconut flour (or cassava or buckwheat)
  • 1/2 tsp bicarb soda
  • 1/2 tsp salt
  • 1 tsp ground cinnamon (or more!)
  • 5 eggs
  • 50 grams butter or coconut oil, melted (I used butter).

How to

  • Soak the fruit in hot boiled water for 15 mins then drain it well.
  • Line a 20 cm – 23cm cake tin
  • Preheat oven to 150 C
  • Combine the ground almonds, cassava flour, bicarb, salt, and cinnamon in a large mixing bowl.
  • Add grated orange zest and chopped nuts.
  • In a separate (smaller) bowl, whisk together the eggs, melted butter, and the squeezed orange juice from your zested orange.
  • Gradually stir in the above wet mixture INTO the DRY mixture. The cake batter is quite thick.
  • Mix in the soaked fruit with a big spoon so the fruit is well distributed. Thanks to the soaked fruit, the batter will now be less thick.
  • Spoon the cake batter in to the lined baking tin and press down with the back of a spoon to eliminate any pockets of air and level the top
  • Bake the cake for between 60 – 70 minutes, or until the centre feels firm to touch or an inserted skewer comes out dry. If it looks at risk of getting a bit burned, cover the top with parchment paper.

Thank you Monique at Nourish Everyday!

Mince pie trifle

Tart, textured, light and fresh, this turned out to be a winner.

(Gosh, food blogs are so glossy these days. Real Food Lover does not fit that category as my pic above demonstrates).

I am here to record recipes to remember.

So here are the layers from bottom to top:

  • Mince pies (in this case, four gluten-free ones) crushed with back of a spoon with added sultanas
  • The juice from a tin of fruit cocktail (see below) in a small saucepan with 3 generous teaspoons of marmalade, a few teaspoons of sugar, lemon juice and a teaspoon of sherry boiled and bubbling until the liquid reduced; then spooned over the crushed mince pies
  • Small tin of fruit cocktail in their own juices with no added sweetness, drained
  • Plus fresh blueberries (I used frozen) for essential tartness
  • Custard (I used 400g shop-bought because ease and time were of the essence)
  • 500g double cream, whipped (NutriBullet was great for this) was the final layer. Chill in fridge.

    The time it took (A.I. suggested I add this bit and an intro. Ha. Ironic laugh): in total, it took about 30 mins to prepare, the longest bit was condensing the liquid.

    The end result was a pudding of different textures (light and crunchy from pie and fruit) and tastes (sweetness from pie and custard offset by bitter-tartness from marmalade and blueberries).

    Delicious – and easy to make. Thus, it is a keeper.


Keepers: Creamed coconut rice and raw vegetable marinade

Recently two recipes have entered my cooking repertoire. Both vegan (as it happens) they complement each other (as it happens). I want to record them with credits.

Creamed coconut rice

Step up, Claire Milne, the leading light behind the No Tesco in Stokes Croft campaign (and compadre), and the genius who came up with the easiest way to make the best coconut rice ever.

To cooked brown rice, add creamed coconut, cut small so it melts easily, and hey presto: soothing, luxurious coconut rice.

For 8 people: 3 mugs of rice for 6 mugs of water (how to cook brown rice here), 1 creamed coconut block (200g) cut in small pieces. (correction on rice proportions thanks for comment below).

(Experiment with adding cooked lentils, squash fried in small cubes, fresh herbs etc.).

Raw vegetable marinade

Step up,  Julia Guest. A filmmaker who made Letter To The Prime Minister in Bagdad during the bombing, in Fallujah during the occupation.

Julia’s current film, In Her Own Image, is an exploration of female divinity – in response to the war in Iraq as she explains at Indiegogo (where you can crowd-source/support the film). 

Anyway, food – where was I?

Raw vegetable marinade

A marinade is a sauce in which you soak your raw food (usually before cooking but in this case, no cooking required).

Which vegetables can you eat raw? Certainly not potatoes.  More info on raw food here.

I ate sliced mushroom, grated courgette, matchsticks of beetroot.

Choose veg you usually eat raw such as tomatoes, cucumber, radish, but think of others such as carrot or cabbage.

Sliver or slice or grate or anyway cut nice and slim.

Superfood dressing: tamari and cider vinegar and olive oil in equal proportions.

The marinade helps digestion of the vegetables.

Let the sliced veg soak in the dressing for a couple of hours before serving.

Would go well with the creamed coconut rice.